
Tech
How Does Banner Design Influence a Brand’s First Impression Online?


When someone visits a website, they form an opinion within seconds. Before they read an article, explore products, or click a button, they notice the visual presentation. One of the first elements that captures attention is the website banner. A well-planned banner design creates a professional image, while a poor one can make visitors leave almost immediately.
As online competition grows, businesses need every visual element to communicate credibility and purpose. Banner design is more than decoration. It is a strategic branding tool that influences trust, engagement, and user behavior from the very first visit.
Why Does Banner Design Matter for a Brand’s First Impression?
Website visitors often judge a business before reading a single sentence. Research by the Nielsen Norman Group shows that users scan pages instead of reading every word. This means visual hierarchy plays a major role in keeping attention.
A banner usually appears at the top of a webpage. It introduces the brand, communicates the main message, and sets expectations for the rest of the content. Whether it appears on a homepage, landing page, or blog, it acts as the digital welcome sign.
A cluttered banner filled with too much text, conflicting colors, or low-quality images creates confusion. On the other hand, a clean layout with consistent branding helps visitors understand what the website offers almost instantly.
Strong banner design can also:
- Build immediate trust
- Improve brand recognition
- Highlight important products or services
- Guide users toward important actions
- Increase time spent on the website
Key Takeaway: A visitor’s first impression often comes from the website banner. Clear, professional banner design helps establish trust within seconds.
What Is Banner Design?
Definition: Banner design is the process of creating a visual header or promotional graphic that communicates a brand message using images, typography, colors, and layout.
A banner is not simply an attractive image. Every design choice serves a purpose.
Good banner design combines:
- Clear typography
- Consistent brand colors
- High-quality visuals
- Strong visual hierarchy
- Concise messaging
- Strategic placement of calls to action
When these elements work together, visitors understand the website’s purpose without unnecessary effort.
Key Takeaway: Banner design combines visual elements to communicate a brand’s identity quickly and effectively.
Which Elements Create an Effective Banner Design?
Successful banners balance creativity with usability.
Clear Headlines
The headline should communicate the main value immediately. Visitors should not have to guess what the page is about.
Examples include:
- Expert Technology Reviews
- Latest Business Insights
- Trusted Digital Marketing Resources
Consistent Branding
Colors, fonts, and imagery should match the company’s identity across every page. Consistency improves recognition and builds confidence.
High-Quality Images
Professional photography or well-designed graphics create credibility. Blurry or pixelated images reduce trust instantly.
Readable Typography
Simple fonts with sufficient contrast improve accessibility and readability across devices.
Clear Call to Action
When appropriate, banners should encourage users to:
- Read more
- Explore categories
- Subscribe
- Contact the business
A clear action helps visitors continue their journey naturally.
Key Takeaway: Effective banner design combines clarity, consistency, and usability to encourage visitors to stay engaged.
How Does Banner Design Build Brand Trust?
People naturally associate polished visuals with professionalism.
Imagine two websites offering similar information. One has an organized, modern banner with consistent branding. The other uses random fonts, outdated graphics, and distracting colors.
Most visitors will trust the first website before comparing the actual content.
Professional banner design communicates:
- Attention to detail
- Brand consistency
- Reliability
- Quality standards
Trust is especially important for websites publishing reviews, business insights, technology articles, and informational resources. Readers expect accurate information from websites that look credible.
Small design improvements can significantly improve perceived authority.
Key Takeaway: Professional visuals encourage visitors to trust a website before they evaluate its content.
Can Banner Design Improve User Experience?
Absolutely.
A banner guides visitors through the website instead of overwhelming them.
Good user experience depends on reducing confusion. Effective banners help users identify:
- Website purpose
- Primary topic
- Navigation direction
- Important content
For magazine-style websites, banners can introduce featured stories, highlight popular categories, or showcase trending content.
Responsive design is equally important. A banner should look attractive on:
- Desktop computers
- Tablets
- Smartphones
Since mobile traffic continues to grow, responsive banner layouts help maintain a positive experience across all screen sizes.
Key Takeaway: Banner design improves user experience by helping visitors understand the website quickly and navigate with confidence.
How Does Banner Design Affect SEO?
Banner design does not directly improve search rankings.
However, it influences several user experience signals that support SEO performance.
These include:
- Longer session duration
- Lower bounce rates
- Higher engagement
- Better page interaction
Google emphasizes creating helpful, people-first content alongside positive page experiences.
Optimized banners should also include:
- Compressed image sizes
- Descriptive alt text
- Mobile-friendly layouts
- Fast loading speed
Large image files can slow websites, which negatively affects both user experience and search performance.
Key Takeaway: Banner design supports SEO indirectly by improving engagement, usability, and page performance.
Common Banner Design Mistakes to Avoid
Even experienced designers make mistakes that reduce effectiveness.
Common problems include:
- Too much text
- Poor color contrast
- Low-resolution images
- Multiple competing messages
- Inconsistent branding
- Slow-loading graphics
- Missing mobile optimization
Each issue makes it harder for visitors to understand the page.
Instead, focus on simplicity. One message is usually more effective than five competing ideas.
Key Takeaway: Simple, focused banner design performs better than cluttered layouts that compete for attention.
Best Practices for Creating Strong Banner Design
A practical approach helps maintain consistency.
Banner Design Checklist
- Define one primary message.
- Use consistent brand colors.
- Choose readable typography.
- Optimize images for fast loading.
- Design for mobile devices first.
- Include a clear visual hierarchy.
- Test different banner variations.
- Measure engagement using analytics.
Small improvements often produce measurable gains in visitor engagement over time.
Key Takeaway: Following proven design principles creates banners that improve both branding and user experience.
Why Is Banner Design Becoming More Important?
Today’s users browse hundreds of websites every week.
Competition for attention has never been higher.
Brands now compete on:
- Visual quality
- Speed
- User experience
- Credibility
Artificial intelligence also summarizes webpages based on clear structure and strong content organization. Well-designed pages supported by clear visual hierarchy improve both human and machine understanding.
As digital experiences continue evolving, thoughtful banner design will remain a critical part of online branding.
Key Takeaway: Strong banner design helps businesses stand out in competitive digital environments while supporting better user experiences.
Frequently Asked Questions
How important is banner design for a website?
Banner design creates the first visual impression and influences whether visitors continue exploring the website.
Key Takeaway: Good banner design increases trust and encourages users to stay longer.
Does banner design affect SEO?
Not directly. However, it improves user experience, engagement, and page performance, which contribute to stronger SEO results.
Key Takeaway: Banner design supports SEO through better usability rather than direct ranking signals.
What makes a good website banner?
A good banner uses clear messaging, quality visuals, consistent branding, readable typography, and responsive design.
Key Takeaway: Simplicity and clarity produce the most effective banners.
Should banners be optimized for mobile devices?
Yes. Mobile users represent a significant share of website traffic, making responsive banners essential.
Key Takeaway: Mobile-friendly banners create consistent experiences across every device.
Conclusion
A website’s banner is often the first opportunity to communicate professionalism, trust, and brand identity. While compelling content keeps visitors engaged, effective banner design encourages them to stay long enough to discover it. By focusing on clarity, consistency, responsive layouts, and performance, businesses can create stronger first impressions that support long-term brand recognition and user engagement.
Key Takeaway: Banner design is a strategic branding asset that shapes first impressions, improves user experience, supports SEO indirectly, and encourages visitors to engage with your website.

If you searched for simplifydiggs com, you probably want a straightforward answer: What is this website, what does it publish, and is the information on it worth trusting?
SimplifyDiggs.com appears to operate as a general-interest content website rather than a dedicated app, software product, marketplace, or specialist service. Independent reviews describe it as a multi-topic publication covering areas such as technology, business, lifestyle, travel, finance, automotive subjects, gaming, and other practical topics.
That broad scope can make the site useful for discovering introductory information. It also means readers need to judge individual articles carefully, particularly when a topic involves money, health, technical decisions, or other areas where accuracy matters.
This guide explains what SimplifyDiggs.com appears to offer, how to evaluate its content, what its trust signals actually tell you, and when you should verify what you read elsewhere.
What Is simplifydiggs com?
simplifydiggs com is best understood as a multi-topic informational website built around articles and guides for general readers.
Rather than specializing in one field, the publication appears to cover a wide range of subjects. Several independent assessments characterize it as an online magazine or general information blog rather than a narrowly focused authority site.
The typical user journey is simple: someone discovers an article through a search engine, reads an explanation or guide, and may continue browsing related categories.
There is no strong evidence that SimplifyDiggs.com should be treated as a specialized professional platform simply because it publishes content about a particular subject. As with any broad publication, the quality and reliability of an article should be evaluated separately from the appearance of the website itself.
simplifydiggs com Quick Facts
| Question | Practical answer |
|---|---|
| What type of website is it? | A general-interest informational publication |
| What does it cover? | Technology, business, lifestyle, travel, finance, automotive topics, gaming, and related subjects |
| Is it a software tool? | It appears to function primarily as a content website |
| Is registration required to understand its content model? | Available descriptions present it mainly as an open article-based publication |
| Does HTTPS prove the content is trustworthy? | No. HTTPS protects the connection; it does not verify editorial accuracy |
| Is it suitable for casual research? | Potentially, particularly for introductory reading |
| Should important claims be verified? | Yes, especially for financial, medical, legal, technical, or purchasing decisions |
What Kind of Content Does SimplifyDiggs.com Publish?
The defining feature of SimplifyDiggs.com is breadth.
Third-party reviews consistently associate the site with multiple unrelated categories, including technology, business, travel, lifestyle, automotive content, finance, gaming, and general informational guides.
That structure has advantages. A general reader can encounter explanations on numerous subjects without moving between specialist publications.
The trade-off is that broad coverage does not automatically produce deep subject expertise.
Technology and Digital Topics
Technology articles on general-interest sites are often useful for explaining concepts in plain language. They can help readers understand terminology, common tools, emerging digital trends, or basic troubleshooting ideas.
For technical implementation, cybersecurity, software configuration, or specifications that may change after an update, however, the manufacturer’s documentation or another primary technical source should usually be checked before acting.
Business and Productivity
Business and productivity content can provide frameworks, definitions, and ideas worth exploring.
The important distinction is between general educational content and professional advice. An article explaining a business concept may be useful without necessarily being sufficient evidence for an investment, hiring, tax, contractual, or operational decision.
Lifestyle and Travel
Lifestyle and travel subjects tend to carry lower informational risk when they involve inspiration, general tips, or personal preferences.
Even here, time-sensitive facts deserve verification. Entry rules, prices, opening hours, transport schedules, safety requirements, and local regulations can change quickly.
Finance and Other High-Stakes Subjects
A website’s standards matter more when its articles could affect a reader’s finances, health, safety, or major purchases.
Independent reviews of SimplifyDiggs.com have raised questions about visible author expertise, editorial transparency, and the site’s broad subject range. Those observations do not establish that every article is inaccurate; they mean readers have less information with which to independently assess how particular claims were researched or reviewed.
Is simplifydiggs com Legit?
The word legit can mean several different things, so it helps to separate the questions.
If you mean, “Does SimplifyDiggs.com appear to be an actual website publishing articles?” the available evidence indicates yes. Current domain data shows the website resolving online with HTTPS support.
If you mean, “Does that prove every article is accurate and authoritative?” the answer is no.
A functioning website, a professional design, and an encrypted connection establish very little about the editorial quality of individual articles.
Legitimacy as a website and authority as an information source are different standards.
Is simplifydiggs com Safe to Visit?
Available technical data shows HTTPS support for the SimplifyDiggs.com hostname. HTTPS encrypts data exchanged between your browser and the website, helping protect the connection from interception in transit.
That is a positive technical signal, but it should not be misunderstood.
HTTPS does not certify that a site’s articles are accurate, that every external link is safe, that an advertised product is reliable, or that a website’s operators possess expertise in every subject they cover.
This distinction matters because many people unconsciously treat the browser padlock as an approval badge. It is better understood as a connection-security feature.
Can You Trust Information on SimplifyDiggs.com?
Trust should be evaluated article by article.
Some SimplifyDiggs.com content may be perfectly adequate for learning basic terminology, discovering a topic, or identifying questions you want to research further. The risk comes from turning introductory material into a final authority when stronger sources are available.
Independent reviewers have specifically noted limited visibility around ownership, author credentials, editorial policies, or subject specialization.
Those are relevant credibility signals because transparent publications normally make it easier to determine who produced an article, what expertise they have, how factual claims were sourced, and who is accountable for corrections.
A Better Way to Judge Individual Articles
Instead of asking whether the entire domain is trustworthy, evaluate the page you are actually reading.
Use this seven-point check:
- Identify the author. Look for a real byline, biography, professional experience, or demonstrable expertise connected to the subject.
- Check the publication date. Outdated information can be misleading even when it was correct when originally published.
- Inspect the evidence. Strong articles link important factual claims to official documents, primary research, recognized institutions, or other credible sources.
- Separate facts from opinions. Recommendations and interpretations should not be presented as established facts without evidence.
- Look for firsthand experience. Original photographs, tests, measurements, screenshots, interviews, or specific observations can indicate genuine experience rather than a generic summary.
- Verify high-impact claims. Confirm medical, financial, legal, security, technical, and safety-related statements with qualified or primary sources.
- Follow important citations. Do not assume a linked source supports the claim simply because a hyperlink exists; open it and check.
This approach is more useful than deciding that an entire website is either completely trustworthy or completely unreliable.
Where simplifydiggs com Can Be Useful
A general-purpose site can still serve a legitimate role in the research process.
SimplifyDiggs.com may be most helpful at the orientation stage: when you have encountered an unfamiliar term, want a readable introduction, need topic ideas, or want to understand the broad shape of a subject before moving into specialist sources.
That role should not be underestimated. Good introductory writing reduces the amount of jargon a reader has to process before reaching authoritative material.
The mistake is treating a convenient starting point as the endpoint.
When You Should Verify Information Elsewhere
Some topics demand more verification than others.
| Topic | How to use a general article | Better final source |
|---|---|---|
| Basic technology concepts | Learn terminology and background | Official documentation or established technical references |
| Product specifications | Understand key features | Manufacturer specifications and independent testing |
| Travel ideas | Build an initial shortlist | Government tourism, transport, airline, or venue sources |
| Finance | Learn general concepts | Regulators, institutions, qualified professionals, primary documentation |
| Health | Understand basic terminology | Government health agencies, medical institutions, qualified clinicians |
| Legal topics | Get broad context only | Current legislation, regulators, courts, or licensed legal professionals |
| Automotive advice | Learn general principles | Manufacturer manuals, service bulletins, trained technicians |
| Business guidance | Explore frameworks and ideas | Primary data, official rules, specialists, or industry-specific sources |
The higher the potential cost of being wrong, the stronger your verification standard should become.
Strengths and Limitations of SimplifyDiggs.com
| Potential strengths | Potential limitations |
|---|---|
| Covers many subjects in one place | Broad coverage can make specialist authority difficult to establish |
| Accessible for introductory research | General explanations may lack technical depth |
| Can help users discover unfamiliar topics | Important claims may require independent confirmation |
| Article-based format is familiar and easy to navigate | Independent reviews have questioned visible author and editorial transparency |
| HTTPS is currently detected for the hostname | Connection security does not guarantee content accuracy |
This balance is important.
A website does not need to be an academic journal or major news organization to produce useful material. But readers should be able to distinguish convenience, readability, expertise, evidence, and accountability rather than treating them as the same thing.
Common Mistakes Readers Should Avoid
One of the biggest mistakes is judging credibility primarily from visual design.
Professional typography, attractive images, category menus, and polished layouts can improve usability, but none of them independently prove expertise.
Another mistake is assuming that a detailed article must be well researched. Length is not evidence. A shorter page based on authoritative sources can be substantially more reliable than a long article that never shows where its claims came from.
Readers should also be cautious about trusting a publication equally across every category. A website might produce strong technology content while offering weaker financial coverage, or vice versa.
Authority is often subject-specific.
How simplifydiggs com Compares With Specialist Sources
The fundamental difference is editorial scope.
A specialist publication concentrates expertise, coverage, and editorial resources around one domain. A general-interest platform spreads its attention across multiple categories.
| Factor | General site such as SimplifyDiggs.com | Specialist source |
|---|---|---|
| Topic range | Broad | Narrower |
| Beginner accessibility | Often strong | Varies |
| Specialist depth | Varies significantly | Usually stronger |
| Subject-specific expertise | Must be checked per author/article | Often easier to establish |
| Best use | Discovery and orientation | Detailed research and verification |
| High-stakes decisions | Requires external confirmation | Prefer strong primary or qualified sources |
Neither format is automatically good or bad.
The key is matching the source to the decision you need to make.
What Would Strengthen SimplifyDiggs.com’s Credibility?
For any broad online publication, several editorial practices can substantially improve trust.
Clear author pages would allow readers to understand who writes the content and why that person is qualified to discuss a subject.
A detailed About page could explain ownership, editorial goals, funding, and the publication’s standards.
Transparent sourcing would make important claims easier to verify. A corrections policy would show readers what happens when published information turns out to be wrong.
Expert review labels could also help on specialist or high-stakes topics, provided the reviewer is clearly identified and genuinely qualified.
Several independent assessments of SimplifyDiggs.com have highlighted these kinds of transparency signals as areas where readers currently have limited visibility.
FAQs About simplifydiggs com
What is simplifydiggs com used for?
SimplifyDiggs.com appears to be primarily an informational publishing website. Readers can use it to browse articles and introductory guides across multiple subjects rather than accessing one specialized software tool or service.
Is SimplifyDiggs.com a property website?
Despite the word “Diggs” potentially suggesting homes or property, available descriptions consistently characterize the current site as a general-interest content publication rather than a dedicated property-search platform.
Does SimplifyDiggs.com cover only technology?
No. Available coverage and independent reviews associate the website with a broader collection of categories that can include technology, business, travel, lifestyle, finance, automotive subjects, gaming, and general guides.
Is simplifydiggs com trustworthy?
It is more useful to assess individual articles than make a blanket judgment about the entire website. Check authorship, evidence, dates, primary sources, and subject expertise, and independently verify high-stakes claims.
Is SimplifyDiggs.com safe because it uses HTTPS?
HTTPS is a useful technical security feature because it encrypts the connection between your browser and the site. It does not establish whether the site’s editorial content, advice, advertisements, or outbound links are trustworthy.
Can I cite SimplifyDiggs.com for academic research?
Check your institution’s source requirements first. For formal academic work, primary research, peer-reviewed literature, official statistics, books from recognized publishers, and authoritative institutional sources will generally provide stronger evidence.
Should I avoid SimplifyDiggs.com completely?
Not necessarily. General-interest sites can be useful for understanding unfamiliar subjects and discovering what to research next. The important step is matching the level of evidence to the importance of the claim.
Final Thoughts on simplifydiggs com
simplifydiggs com appears to be a broad informational website designed around accessible articles on multiple subjects. Its strongest potential role is as a starting point: a place to learn basic concepts, explore unfamiliar topics, and identify questions worth investigating further.
The smartest approach is neither blind trust nor automatic dismissal. Evaluate the specific article, look for transparent authorship and credible evidence, check how current the information is, and verify consequential claims with primary or specialist sources.
Used that way, simplifydiggs com can function as one part of a wider research process rather than the only source on which an important decision depends.
If you searched for hawkecentre .com, you are probably trying to understand what the website is, what kind of content it publishes, whether it offers guest-posting or SEO opportunities, and whether you should trust the domain before interacting with it.
The website at hawkecentre.com currently operates as a broad-topic publishing platform. Its homepage features articles covering technology, business, travel, games, fashion, home improvement, education and other subjects, while its site copy also references SEO, content strategy and guest-posting services.
This guide separates what can be verified from the site’s own pages from claims made elsewhere online so you can make a more informed decision.
Quick Facts About hawkecentre .com
| Detail | What Current Sources Show |
|---|---|
| Website | hawkecentre.com |
| Main format | Multi-topic blog and article publishing website |
| Main categories | Business, technology, travel, games, fashion, home improvement, advice and education |
| Additional topics | Health, real estate, SEO and other niche subjects |
| Publishing opportunities | The site links to a “Write for Us” section and references guest-post submissions |
| SEO services | Terms and site copy mention SEO, digital marketing, content strategy and related services |
| Platform | Independent sources identify the website as WordPress-based |
| HTTPS | The domain has been reported as using a valid SSL certificate |
| Security reputation | Mixed; automated website scanners have produced conflicting assessments |
| Important distinction | It is not the official website of the Bob Hawke Prime Ministerial Centre |
What Is hawkecentre .com?
At its simplest, hawkecentre .com is a content website containing articles across a wide range of subjects.
The current homepage describes Hawkecentre as a destination for people interested in technology, food and travel, but the actual navigation is considerably broader. Categories visible on the website include business, artificial intelligence, reviews, hardware, travel, games, fashion, home improvement, advice and education.
Recent and archived articles extend beyond those core categories into subjects such as:
- Property and real estate
- Personal finance
- Cybersecurity
- Business services
- Health and wellness
- Home services
- Pet care
- Cloud computing
- SEO and digital marketing
That makes the site closer to a general-interest publishing platform than a narrowly focused specialist magazine.
Why the Site Can Be Difficult to Categorize
Hawkecentre’s positioning is not completely uniform.
Its About page describes the platform mainly as a technology-oriented resource offering articles, reviews and news, while the homepage promotes a broader food, technology and travel identity. Elsewhere, site copy describes Hawke Centre in connection with SEO and guest-posting services.
For visitors, this means it is better to judge individual sections and articles on their own merits rather than assuming every page follows one editorial niche.
What Content Can You Find on hawkecentre .com?
Technology and AI
Technology is one of the site’s most visible categories.
Its navigation includes dedicated areas for artificial intelligence, hardware and reviews, while individual articles cover subjects ranging from business IT infrastructure to cloud computing and VoIP systems.
Readers looking for technology content should still check:
- When the article was published or updated
- Whether an identifiable author is listed
- Whether technical claims link to primary sources
- Whether recommendations are editorial or promotional
- Whether product specifications remain current
Technology changes quickly, so publication date and source quality matter as much as readability.
Business and Digital Marketing
Business content is another significant part of Hawkecentre.
The site’s own terms refer to SEO, digital marketing, content strategy, web development and consulting services. Its article archive also includes business finance, property, managed IT and search-marketing topics.
This mix suggests the website serves both general readers and businesses interested in gaining online exposure.
Travel and Lifestyle
Travel appears in the main navigation, while lifestyle-related content extends into home improvement, fashion, health, pet care and property.
Because these topics can range from casual advice to decisions involving health or money, readers should distinguish between general informational articles and content requiring professional expertise.
For medical, financial or legal decisions in particular, an article should be treated as a starting point for research—not a substitute for qualified professional advice.
Is hawkecentre .com the Bob Hawke Centre Website?
No. This is an important distinction because some search results currently appear to confuse the two entities.
The Bob Hawke Prime Ministerial Centre is an Australian public-learning institution associated with Adelaide University and has an official website on the university’s adelaide.edu.au domain. Its work includes public talks, exhibitions and programs such as the Annual Hawke Lecture.
By contrast, hawkecentre.com is the multi-category publishing and SEO-related website discussed in this article.
If you are looking for lectures, exhibitions, university programs or the Bob Hawke Prime Ministerial Centre, use the official university website rather than assuming that hawkecentre.com represents that institution.
Does hawkecentre .com Accept Guest Posts?
There are strong indications that the website accepts or has accepted contributed content.
The homepage includes a “Write for Us” link, and author information appearing on multiple published articles explicitly discusses technology guest-post submissions and opportunities for content writers.
That can make the domain relevant to:
- Content marketers
- SEO agencies
- Business owners
- Freelance writers
- PR professionals
- Brands seeking editorial mentions
- Publishers looking for content partnerships
However, seeing a “Write for Us” page does not automatically make a placement valuable.
Before Submitting a Guest Post
Evaluate the opportunity beyond headline SEO metrics.
Check the following:
- Topical relevance
A link from an article closely related to your business is generally more meaningful to users than an unrelated placement. - Editorial standards
Review recent articles. Look for factual sourcing, useful information, real authorship and meaningful editing. - Existing outbound links
A website publishing excessive unrelated commercial links may offer less editorial value. - Traffic quality
Do not rely solely on third-party estimates. Look at which pages appear to receive search visibility and whether that traffic matches your target audience. - Indexation
Check whether recent articles are actually indexed in search engines. - Link attributes
If you are paying for placement, understand whether links are appropriately disclosed and tagged according to search-engine policies. - Publication permanence
Ask how long the article will remain live and whether URLs or links can later be changed.
The question is not simply, “Can I publish here?” It is, “Will publishing here genuinely help the intended audience and support my wider marketing strategy?”
Is hawkecentre .com Safe to Visit?
The available evidence is mixed, so a definitive “safe” or “unsafe” label would be misleading.
The website currently loads over HTTPS, and independent scanners have identified a valid SSL certificate. HTTPS encrypts the connection between your browser and the website, but it does not by itself prove that every page, download or transaction on a domain is trustworthy.
More importantly, automated reputation services have produced different findings.
What Independent Scanners Have Reported
PCrisk reported in an August 14, 2026 scan that 6 of 91 security engines flagged the domain and assigned a 39/100 trust score in its automated assessment. The same report also noted that results were point-in-time findings that could contain false positives or incomplete information.
ScamAdviser has presented a more favorable overall description, noting factors including an SSL certificate and several years of domain history while also highlighting limited popularity, lack of substantial independent reviews and other trust concerns.
Another automated reputation service, Gridinsoft, has previously classified the website as suspicious based on its own risk model.
What Those Results Actually Mean
Automated scanners are signals, not final verdicts.
Different services use different databases, heuristics and update schedules. A legitimate site can occasionally trigger warnings, while a valid SSL certificate can also exist on an unsafe website.
A practical approach is therefore to treat hawkecentre .com with normal web-security caution, particularly before providing sensitive information, downloading files or making payments.
A Practical Trust Checklist Before Using the Website
Before engaging with any unfamiliar publishing or marketing platform, perform a few basic checks.
1. Confirm You Are on the Correct Domain
Look carefully at the address bar.
The domain discussed here is:
hawkecentre.com
Beware of misspellings, additional words, unfamiliar subdomains or links received through unsolicited messages.
2. Check the Exact Page You Want to Use
A website’s homepage reputation does not tell you everything about an individual URL.
If you plan to submit content, purchase marketing services or download something, check that specific page rather than relying entirely on a domain-level score.
3. Verify Contact Details Independently
The Hawkecentre site currently publishes an email address and WhatsApp contact information on its contact and footer sections.
If a transaction is involved, confirm that the person responding actually represents the website and that payment instructions match previously verified communication.
4. Avoid Reusing Important Passwords
If an unfamiliar website requires account creation, use a unique password.
Never reuse the password protecting your primary email, banking account, business CMS or cloud storage.
5. Be Careful With Downloads
Reading a normal webpage carries a different risk profile from downloading executable files, browser extensions or unfamiliar archives.
Scan unexpected files before opening them.
6. Review Payment Terms First
Hawkecentre’s published terms state that invoices for certain SEO services may be required in full before work begins unless otherwise agreed. Anyone considering a paid service should therefore review the current terms, scope of work, deliverables and refund conditions before transferring money.
How to Evaluate Articles Published on Hawkecentre
A site’s authority should never be judged from its domain name alone.
For any article on Hawkecentre—or any other multi-author publishing platform—use the following quality test.
Check the Author
Ask:
- Is the writer clearly named?
- Is relevant experience provided?
- Can their expertise be independently verified?
- Have they written extensively about the subject?
An author bio is helpful, but genuine expertise should also be reflected in the accuracy and depth of the article.
Check the Evidence
Strong informational content should show where important claims come from.
This is especially important for:
- Health recommendations
- Financial guidance
- Cybersecurity advice
- Legal information
- Scientific claims
- Statistics
- Product comparisons
Primary sources, government publications, established research institutions and original manufacturer documentation are generally preferable to circular references between blogs.
Check the Date
Some advice ages faster than other advice.
A home-decor idea may remain useful for years, while software instructions, cybersecurity practices, regulations and financial figures can become outdated quickly.
Separate Information From Promotion
A useful sponsored or contributed article can still provide genuine value.
The key is transparency. Readers should be able to understand when a company, product or service is being promoted and distinguish marketing claims from independently supported facts.
Pros and Limitations of hawkecentre .com
Potential Advantages
- Covers a wide variety of topics in one place
- Maintains dedicated categories for technology and related subjects
- Publishes new material regularly
- Offers opportunities for contributed content
- Includes business and SEO-focused resources
- Provides visible contact information
- Contains a substantial archive of articles
Points to Consider
- The website covers many unrelated niches, so topical specialization varies
- Branding and positioning differ between some pages
- Some content appears commercially oriented
- External security services currently provide conflicting reputation signals
- Independent reputation data appears relatively limited
- Article quality should be assessed page by page rather than assumed from the domain
Is Hawkecentre Useful for SEO and Backlink Building?
Potentially—but backlinks should never be evaluated purely by a website’s headline authority metric.
A placement is more defensible when the article exists primarily to help readers and the reference to your website genuinely adds context or evidence.
Before pursuing a placement, examine:
- Relevance between your site and the article
- Organic visibility of the publication
- Quality of recent posts
- Indexation consistency
- Editorial review standards
- Number and quality of outbound links
- Anchor-text practices
- Whether paid links are disclosed correctly
- Whether readers are likely to gain value from the link
A smaller relevant publication can sometimes contribute more meaningful referral traffic and brand exposure than a larger but unrelated site.
Avoid building a strategy around publishing nearly identical promotional articles across dozens of unrelated websites. Sustainable SEO depends much more on useful content, genuine authority, natural citations and satisfying search intent.
Common Mistakes When Researching hawkecentre .com
Confusing It With the Official Hawke Centre
This is currently one of the easiest mistakes to make.
The general publishing website at hawkecentre.com and the Bob Hawke Prime Ministerial Centre’s official university website are separate entities.
Trusting One Third-Party Metric
Domain authority, domain rating, spam scores and automated trust ratings can all be useful signals.
None should be treated as absolute proof of quality, security or SEO value.
Buying a Placement Without Reviewing Recent Content
A domain may have old pages with strong links while its current publishing standards are completely different.
Always inspect recent posts.
Focusing Only on the Backlink
A quality contribution should make sense even without SEO benefits.
Ask whether the article introduces your business to a relevant audience, demonstrates expertise or answers a real searcher’s question.
Frequently Asked Questions About hawkecentre .com
What is hawkecentre .com?
hawkecentre .com refers to hawkecentre.com, a multi-topic article and publishing website covering areas including technology, business, travel, games, fashion, home improvement, education and other subjects. Its own pages also reference SEO and guest-posting services.
Is Hawkecentre a technology website?
Technology is a major part of the site, and its About page specifically emphasizes technology articles, reviews and news. However, the website currently publishes across numerous non-technology categories as well.
Does Hawkecentre offer guest posting?
The site includes a “Write for Us” link, and author information on published articles refers to opportunities for writers to submit guest posts. Anyone considering submission should check the latest editorial and commercial conditions directly before proceeding.
Is hawkecentre.com safe?
There is no simple answer based on the available third-party evidence. Some automated services report cautionary signals, while others provide a more favorable assessment. Users should verify current security results and exercise additional care before sharing sensitive information, downloading files or making payments.
Is hawkecentre.com connected to the Bob Hawke Prime Ministerial Centre?
The available official information does not support that conclusion. The Bob Hawke Prime Ministerial Centre operates through Adelaide University’s official web presence, while hawkecentre.com is a separate general publishing website.
Is Hawkecentre suitable for publishing business content?
The website publishes business, technology, SEO and other commercial topics, so certain subjects may fit its existing coverage. Relevance, editorial quality, disclosure requirements and audience value should still be evaluated before submitting content.
Final Thoughts on hawkecentre .com
hawkecentre .com is best understood as a broad digital publishing website rather than a single-topic specialist resource. It currently publishes content spanning technology, business, travel, property, home improvement, education and numerous other subjects while also presenting SEO and guest-posting opportunities.
For ordinary readers, the smartest approach is to evaluate each article based on its author, evidence, publication date and purpose. For marketers, guest contributors or businesses considering paid services, deeper due diligence is worthwhile—particularly because independent security and reputation tools currently provide mixed signals about the domain.
Most importantly, do not confuse the domain with the separate Bob Hawke Prime Ministerial Centre. Once that distinction is clear, visitors can assess hawkecentre .com for what it actually is: a multi-category content and marketing-oriented website whose individual pages and opportunities should be evaluated on their own quality, relevance and trust signals.
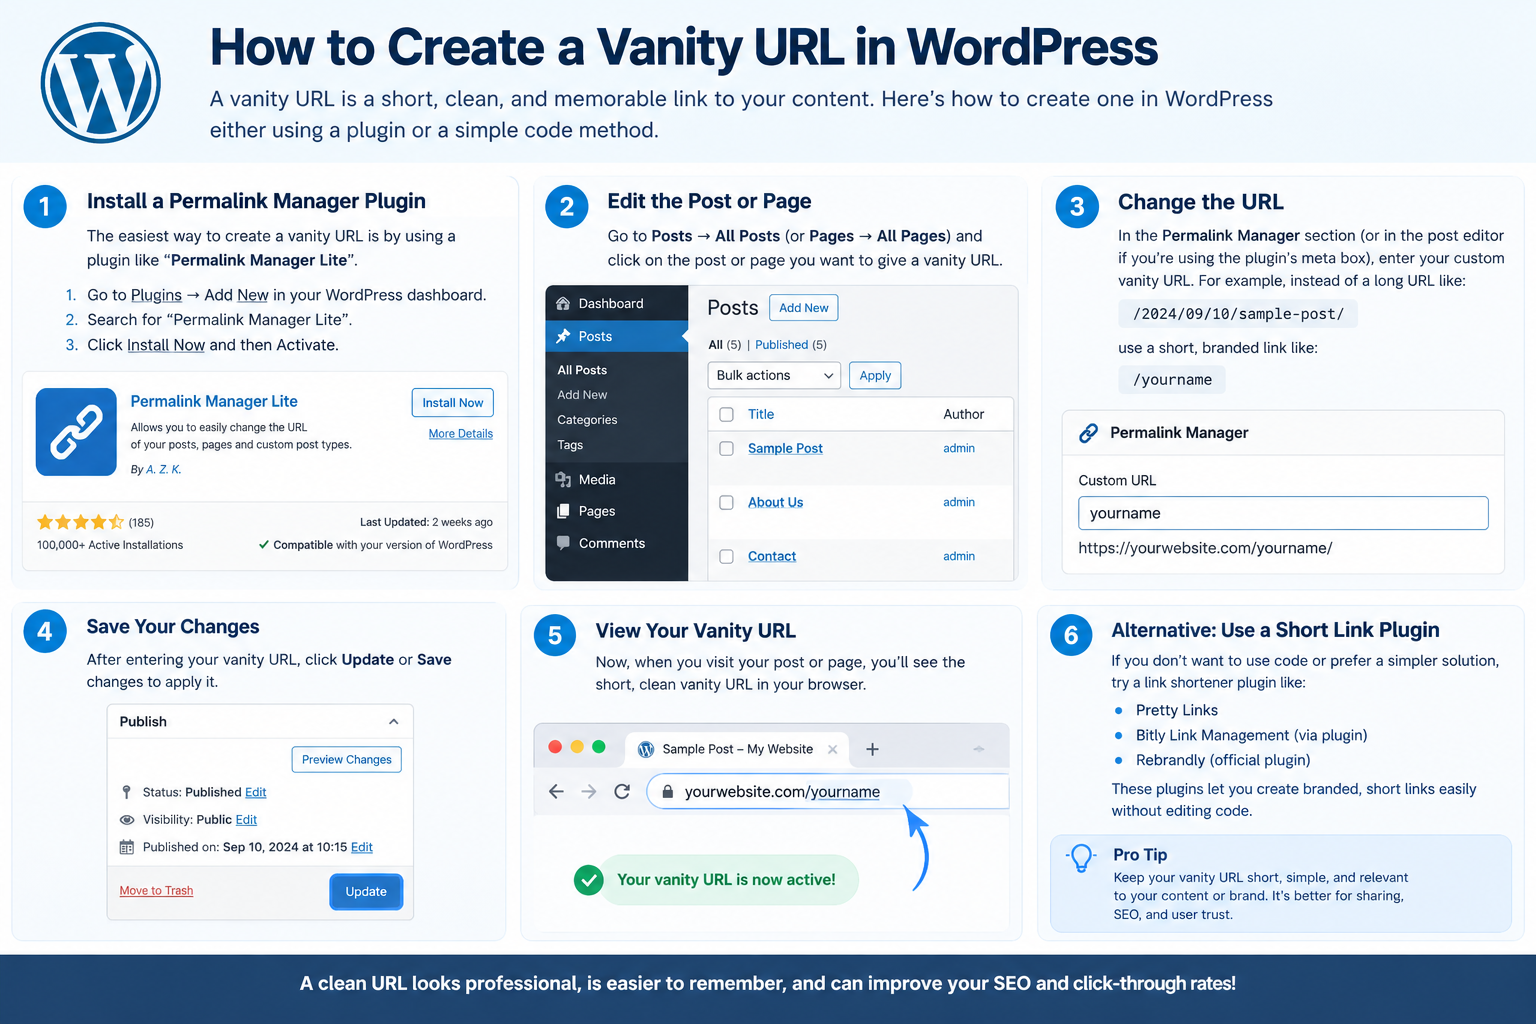
A long, complicated URL is difficult to remember, awkward to share, and rarely looks good in an email, social post, podcast, or printed marketing material. Learning how to create a vanity URL in WordPress gives you a cleaner alternative, such as yourdomain.com/offer instead of a lengthy page or tracking URL.
WordPress gives you several ways to do this. You can edit a page slug, create a redirect, use a link-management plugin, or configure a server-level redirect. The right approach depends on whether you want to change the page’s real URL or simply create a memorable shortcut to another destination.
What Is a Vanity URL?
A vanity URL is a short, branded, easy-to-remember web address created for a specific page, campaign, product, download, or external destination.
For example:
example.com/summer-sale
could redirect visitors to:
example.com/shop/special-offers/summer-2026/?utm_source=offline&utm_campaign=summer
The visitor only needs to remember the short version.
Vanity URLs are commonly used for:
- Marketing campaigns
- Affiliate links
- Social media profiles
- Podcast and video descriptions
- QR codes
- Email campaigns
- Product launches
- Lead magnets
- Event registration pages
- Long URLs containing tracking parameters
A vanity URL should not be confused with a normal WordPress permalink. WordPress defines permalinks as the permanent URLs assigned to posts, pages, archives, and other content. Its permalink settings allow site owners to choose structures such as post names or custom formats.
Vanity URL vs. WordPress Permalink
The distinction matters because changing the wrong URL can create unnecessary redirects or broken links.
| Feature | Vanity URL | WordPress Permalink |
|---|---|---|
| Main purpose | Create a memorable shortcut | Define the actual content URL |
| Example | site.com/demo |
site.com/blog/product-demo-guide/ |
| Usually redirects? | Yes | No |
| Can point externally? | Yes | Normally no |
| Useful for campaigns? | Excellent | Limited |
| Can include tracking behind it? | Yes | Possible, but less clean |
| Best for permanent page URLs? | Not usually | Yes |
If you simply want a cleaner URL for an existing page, editing its WordPress slug may be enough. If you want a short address that points somewhere else, you need a redirect or link-management solution.
How to Create a Vanity URL in WordPress
There are four practical methods. For most website owners, a redirect plugin or dedicated link-management plugin is the easiest option.
Method 1: Create a Clean URL by Editing the WordPress Slug
If the page itself should live at the shorter URL, you may not need a redirect at all.
For example, instead of:
example.com/services/our-complete-professional-seo-consulting-service/
you might use:
example.com/seo/
To do this:
- Open WordPress Dashboard → Pages or Posts.
- Edit the page you want to change.
- Locate its URL or permalink setting.
- Replace the existing slug with a short version such as
seo. - Update or publish the page.
- Open the new URL in another browser tab and verify that it loads correctly.
WordPress uses the post or page slug as part of its permalink structure, and its official documentation recommends readable URL structures that help visitors and search engines understand the content.
This method is best when the short URL should become the page’s actual permanent address.
Be Careful When Changing an Existing URL
Changing the slug of an already established page is different from creating a new vanity URL.
If the old URL has backlinks, rankings, bookmarks, or traffic, redirect it to the new address. Otherwise, visitors following the old URL may encounter a 404 error.
For a permanent URL change, Google recommends a permanent server-side redirect such as HTTP 301 or 308 when possible.
Method 2: Create a Vanity URL With Pretty Links
A dedicated link-management plugin is useful when you regularly create branded links for campaigns, affiliate destinations, resources, or external websites.
Pretty Links, for example, allows you to set a destination URL and choose a custom slug. Its documentation gives the example of turning a destination into a clean link such as yoursite.com/launch.
Step 1: Install the Plugin
From your WordPress dashboard:
Plugins → Add New Plugin
Search for Pretty Links, install it, and activate it.
Step 2: Add a New Link
Go to:
Pretty Links → Add New Link
You will need two important values:
Target URL:
The actual page visitors should reach.
Example:
https://example.com/products/software/?utm_source=youtube&utm_campaign=launch
Vanity slug:
The short path visitors will see.
Example:
software
Your finished URL becomes:
https://example.com/software
Step 3: Choose the Appropriate Redirect Type
The correct redirect depends on what the vanity link represents.
Use a permanent redirect when the vanity URL is intended to consistently point to the same permanent destination.
Use a temporary redirect when the destination may change or the redirect is only needed temporarily.
Google treats permanent and temporary redirects differently. Permanent redirects are signals that the destination should become canonical, while temporary redirects generally tell Google to retain the source URL as the primary one.
Step 4: Test the Link
Open the vanity URL in a private browser window.
Confirm that:
- It loads without an error.
- It reaches the correct destination.
- HTTPS remains enabled.
- Tracking parameters are preserved when required.
- It does not pass through unnecessary intermediate redirects.
A vanity link should feel instant. If it moves through several redirects before reaching its final destination, fix the chain.
Method 3: Create a Vanity URL With the Redirection Plugin
If you only need straightforward URL redirects and do not need advanced link-management features, the Redirection plugin is another option.
The plugin supports 301 redirects and can manage redirects without requiring you to manually edit Apache or Nginx configuration files.
Suppose you want:
example.com/book
to send visitors to:
example.com/resources/complete-wordpress-booking-guide/
After installing and activating Redirection:
- Open Tools → Redirection.
- Add
/bookas the source URL. - Enter the full destination as the target URL.
- Select the appropriate redirect behavior.
- Save the redirect.
- Test
example.com/book.
This approach works particularly well for businesses that need a small number of memorable campaign or promotional URLs without a separate link-management dashboard.
Method 4: Create a Vanity URL Without a Plugin
Advanced users can configure redirects directly at the server level.
For an Apache website, this may involve .htaccess. On Nginx, the redirect is normally added to the relevant server configuration.
Google considers server-side HTTP redirects the preferred option when permanent redirects need to communicate URL changes reliably to users and search engines.
For example, an Apache redirect could conceptually send:
/offer
directly to:
https://example.com/special-offer/
Server-level redirects have advantages because they can execute before WordPress fully loads. However, a configuration error can affect your entire website.
Use this method only if you are comfortable working with your server configuration or have access to a developer.
Which Method Should You Choose?
Your goal determines the best solution.
| Situation | Recommended Method |
|---|---|
| Creating a new short page URL | Edit the WordPress slug |
| Creating campaign shortcuts | Link-management plugin |
| Redirecting a few internal URLs | Redirection plugin |
| Managing many branded marketing links | Link-management plugin |
| High-performance server redirects | Server configuration |
| Changing an established page URL | New slug + permanent redirect |
| Hiding long tracking parameters | Vanity redirect |
For most non-technical WordPress users, a plugin-based method offers the best balance between simplicity and control.
How to Choose a Good Vanity URL
The redirect itself is only half of the job. The slug needs to be memorable.
A URL such as:
example.com/go?id=4728x
defeats much of the purpose.
A better version might be:
example.com/demo
or:
example.com/free-guide
Good vanity URLs generally share several characteristics.
Keep It Short
Use the fewest words necessary to communicate the destination.
Better:
example.com/pricing
Less memorable:
example.com/check-our-latest-pricing-options
Make the Destination Predictable
Someone seeing example.com/demo should reasonably expect a demo-related page.
Avoid misleading URLs such as:
example.com/free
when the visitor is immediately sent to a paid checkout page.
Use Real Words
Human-readable words are easier to remember and communicate verbally.
Compare:
example.com/a8x52q
with:
example.com/webinar
The second link is far easier to mention in a video, presentation, podcast, or conversation.
Prefer Lowercase Letters and Hyphens
Keep naming conventions consistent.
Examples:
example.com/seo-guide
example.com/free-trial
Consistency reduces typing errors and makes your campaign URLs easier to manage.
Should a Vanity URL Use a 301 or 302 Redirect?
This is one of the most commonly misunderstood parts of vanity URLs.
A 301 redirect generally indicates a permanent move. A 302 redirect indicates that the redirect is temporary.
Google explains that permanent redirects such as 301 and 308 are signals that the target should be treated as canonical, whereas temporary redirects such as 302 and 307 do not send the same permanent canonicalization signal.
For example, if:
example.com/services
has permanently moved to:
example.com/solutions
a permanent redirect makes sense.
But if:
example.com/weekend-sale
temporarily points to a specific promotion that will change shortly, a temporary redirect may better reflect the situation.
Do not automatically choose 301 simply because it is familiar.
Can Vanity URLs Help SEO?
A vanity URL is not an automatic ranking shortcut.
Its primary benefits are usability, branding, memorability, and campaign management. A clean URL may also be easier for people to recognize, type, and share.
The SEO value comes from implementing redirects correctly rather than from simply shortening a URL.
For permanent URL migrations, redirects help search engines understand where content has moved. Google specifically advises sending an old URL directly to its final destination and avoiding unnecessary redirect chains because chains add latency and complicate crawling.
For example, avoid:
/deal → /promotion → /products/sale → /final-offer
Prefer:
/deal → /final-offer
Vanity URLs and UTM Tracking
One particularly useful strategy is placing campaign tracking parameters inside the destination while keeping the public URL clean.
Instead of promoting:
example.com/course/?utm_source=instagram&utm_medium=social&utm_campaign=autumn_launch
you can promote:
example.com/course-offer
The vanity URL can then redirect to the full tracking URL.
This gives marketers a cleaner public-facing link without sacrificing campaign attribution.
You could also create separate vanity URLs for individual channels:
example.com/instagram
example.com/youtube
example.com/email
Each can point to the same landing page with different tracking parameters.
That makes campaign reporting easier while keeping the URLs visitors see simple.
Common Vanity URL Mistakes to Avoid
Creating Redirect Chains
Every vanity URL should ideally point directly to its final destination.
Do not keep redirecting old vanity URLs into newer vanity URLs. Google recommends keeping redirect chains low and, whenever possible, redirecting directly to the final URL.
Reusing the Same Slug
Before creating /sale, check whether a WordPress page, post, category, custom post type, or existing redirect already uses that path.
Slug conflicts can produce unexpected results.
Making URLs Too Generic
Links such as:
/go
/click
/link1
may be short, but they provide almost no context.
Prefer descriptive paths such as:
/book-demo
/pricing
/summer-sale
Changing Vanity URLs Too Often
A vanity URL becomes valuable when people remember and reuse it.
If you advertise example.com/demo across videos, printed materials, and emails, avoid changing it without a strong reason.
You can change the destination behind the vanity URL while keeping the public address consistent when that fits the campaign.
Forgetting to Test Mobile and HTTPS
Always test the completed link on both desktop and mobile.
Also confirm that it resolves to the HTTPS version of your destination and does not introduce unnecessary HTTP-to-HTTPS or www/non-www redirect hops.
Redirecting Everything to the Homepage
A vanity URL should lead to the destination users reasonably expect.
For example:
example.com/pricing
should not unexpectedly send visitors to the homepage.
Relevant destinations provide a better user experience and make campaign links easier to trust.
What Happens if Your Vanity URL Returns a 404?
First, confirm that the slug is correct.
Then check:
- Whether the redirect is enabled
- Whether another page uses the same slug
- Whether your plugin is active
- Whether the target URL is valid
- Whether WordPress rewrite rules need refreshing
WordPress notes that its permalink system depends on rewrite rules. Visiting Settings → Permalinks causes WordPress to flush those rewrite rules, which can help when a newly configured URL is not resolving correctly.
Do not repeatedly change permalink settings just to troubleshoot. First verify the redirect and slug configuration.
Can a Vanity URL Point to Another Website?
Yes.
For example:
yourdomain.com/facebook
could redirect visitors to your business’s Facebook page.
Similarly:
yourdomain.com/partner
could point to a partner landing page, and:
yourdomain.com/register
could send visitors to an external registration platform.
This can be useful because you continue sharing an address on your own branded domain even when the final destination is hosted elsewhere.
If the third-party destination changes later, you can update the redirect without replacing the public-facing vanity URL everywhere it was previously published.
Can You Create Multiple Vanity URLs for the Same Page?
Yes, and there are valid marketing reasons to do so.
Imagine the destination is:
example.com/software/free-trial/
You might create:
example.com/youtube-demo
example.com/email-demo
example.com/podcast-demo
Each vanity URL could point to the same landing page while carrying different tracking parameters.
However, do not create dozens of unnecessary variations merely for SEO. Vanity URLs are most useful when each one has a clear user or campaign purpose.
Best Practices for Managing Vanity URLs at Scale
As the number of links grows, organization becomes
SEO Title: How to Create a Vanity URL in WordPress: Easy Guide
Meta Description: Learn how to create a vanity URL in WordPress using clean slugs, redirects, and link plugins. Follow the steps, avoid SEO mistakes, and build better links.
How to Create a Vanity URL in WordPress: Easy Guide
A long, complicated URL is difficult to remember, awkward to share, and rarely looks good in an email, social post, podcast, or printed marketing material. Learning how to create a vanity URL in WordPress gives you a cleaner alternative, such as yourdomain.com/offer instead of a lengthy page or tracking URL.
WordPress gives you several ways to do this. You can edit a page slug, create a redirect, use a link-management plugin, or configure a server-level redirect. The right approach depends on whether you want to change the page’s real URL or simply create a memorable shortcut to another destination.
What Is a Vanity URL?
A vanity URL is a short, branded, easy-to-remember web address created for a specific page, campaign, product, download, or external destination.
For example:
example.com/summer-sale
could redirect visitors to:
example.com/shop/special-offers/summer-2026/?utm_source=offline&utm_campaign=summer
The visitor only needs to remember the short version.
Vanity URLs are commonly used for:
- Marketing campaigns
- Affiliate links
- Social media profiles
- Podcast and video descriptions
- QR codes
- Email campaigns
- Product launches
- Lead magnets
- Event registration pages
- Long URLs containing tracking parameters
A vanity URL should not be confused with a normal WordPress permalink. WordPress defines permalinks as the permanent URLs assigned to posts, pages, archives, and other content. Its permalink settings allow site owners to choose structures such as post names or custom formats.
Vanity URL vs. WordPress Permalink
The distinction matters because changing the wrong URL can create unnecessary redirects or broken links.
| Feature | Vanity URL | WordPress Permalink |
|---|---|---|
| Main purpose | Create a memorable shortcut | Define the actual content URL |
| Example | site.com/demo |
site.com/blog/product-demo-guide/ |
| Usually redirects? | Yes | No |
| Can point externally? | Yes | Normally no |
| Useful for campaigns? | Excellent | Limited |
| Can include tracking behind it? | Yes | Possible, but less clean |
| Best for permanent page URLs? | Not usually | Yes |
If you simply want a cleaner URL for an existing page, editing its WordPress slug may be enough. If you want a short address that points somewhere else, you need a redirect or link-management solution.
How to Create a Vanity URL in WordPress
There are four practical methods. For most website owners, a redirect plugin or dedicated link-management plugin is the easiest option.
Method 1: Create a Clean URL by Editing the WordPress Slug
If the page itself should live at the shorter URL, you may not need a redirect at all.
For example, instead of:
example.com/services/our-complete-professional-seo-consulting-service/
you might use:
example.com/seo/
To do this:
- Open WordPress Dashboard → Pages or Posts.
- Edit the page you want to change.
- Locate its URL or permalink setting.
- Replace the existing slug with a short version such as
seo. - Update or publish the page.
- Open the new URL in another browser tab and verify that it loads correctly.
WordPress uses the post or page slug as part of its permalink structure, and its official documentation recommends readable URL structures that help visitors and search engines understand the content.
This method is best when the short URL should become the page’s actual permanent address.
Be Careful When Changing an Existing URL
Changing the slug of an already established page is different from creating a new vanity URL.
If the old URL has backlinks, rankings, bookmarks, or traffic, redirect it to the new address. Otherwise, visitors following the old URL may encounter a 404 error.
For a permanent URL change, Google recommends a permanent server-side redirect such as HTTP 301 or 308 when possible.
Method 2: Create a Vanity URL With Pretty Links
A dedicated link-management plugin is useful when you regularly create branded links for campaigns, affiliate destinations, resources, or external websites.
Pretty Links, for example, allows you to set a destination URL and choose a custom slug. Its documentation gives the example of turning a destination into a clean link such as yoursite.com/launch.
Step 1: Install the Plugin
From your WordPress dashboard:
Plugins → Add New Plugin
Search for Pretty Links, install it, and activate it.
Step 2: Add a New Link
Go to:
Pretty Links → Add New Link
You will need two important values:
Target URL:
The actual page visitors should reach.
Example:
https://example.com/products/software/?utm_source=youtube&utm_campaign=launch
Vanity slug:
The short path visitors will see.
Example:
software
Your finished URL becomes:
https://example.com/software
Step 3: Choose the Appropriate Redirect Type
The correct redirect depends on what the vanity link represents.
Use a permanent redirect when the vanity URL is intended to consistently point to the same permanent destination.
Use a temporary redirect when the destination may change or the redirect is only needed temporarily.
Google treats permanent and temporary redirects differently. Permanent redirects are signals that the destination should become canonical, while temporary redirects generally tell Google to retain the source URL as the primary one.
Step 4: Test the Link
Open the vanity URL in a private browser window.
Confirm that:
- It loads without an error.
- It reaches the correct destination.
- HTTPS remains enabled.
- Tracking parameters are preserved when required.
- It does not pass through unnecessary intermediate redirects.
A vanity link should feel instant. If it moves through several redirects before reaching its final destination, fix the chain.
Method 3: Create a Vanity URL With the Redirection Plugin
If you only need straightforward URL redirects and do not need advanced link-management features, the Redirection plugin is another option.
The plugin supports 301 redirects and can manage redirects without requiring you to manually edit Apache or Nginx configuration files.
Suppose you want:
example.com/book
to send visitors to:
example.com/resources/complete-wordpress-booking-guide/
After installing and activating Redirection:
- Open Tools → Redirection.
- Add
/bookas the source URL. - Enter the full destination as the target URL.
- Select the appropriate redirect behavior.
- Save the redirect.
- Test
example.com/book.
This approach works particularly well for businesses that need a small number of memorable campaign or promotional URLs without a separate link-management dashboard.
Method 4: Create a Vanity URL Without a Plugin
Advanced users can configure redirects directly at the server level.
For an Apache website, this may involve .htaccess. On Nginx, the redirect is normally added to the relevant server configuration.
Google considers server-side HTTP redirects the preferred option when permanent redirects need to communicate URL changes reliably to users and search engines.
For example, an Apache redirect could conceptually send:
/offer
directly to:
https://example.com/special-offer/
Server-level redirects have advantages because they can execute before WordPress fully loads. However, a configuration error can affect your entire website.
Use this method only if you are comfortable working with your server configuration or have access to a developer.
Which Method Should You Choose?
Your goal determines the best solution.
| Situation | Recommended Method |
|---|---|
| Creating a new short page URL | Edit the WordPress slug |
| Creating campaign shortcuts | Link-management plugin |
| Redirecting a few internal URLs | Redirection plugin |
| Managing many branded marketing links | Link-management plugin |
| High-performance server redirects | Server configuration |
| Changing an established page URL | New slug + permanent redirect |
| Hiding long tracking parameters | Vanity redirect |
For most non-technical WordPress users, a plugin-based method offers the best balance between simplicity and control.
How to Choose a Good Vanity URL
The redirect itself is only half of the job. The slug needs to be memorable.
A URL such as:
example.com/go?id=4728x
defeats much of the purpose.
A better version might be:
example.com/demo
or:
example.com/free-guide
Good vanity URLs generally share several characteristics.
Keep It Short
Use the fewest words necessary to communicate the destination.
Better:
example.com/pricing
Less memorable:
example.com/check-our-latest-pricing-options
Make the Destination Predictable
Someone seeing example.com/demo should reasonably expect a demo-related page.
Avoid misleading URLs such as:
example.com/free
when the visitor is immediately sent to a paid checkout page.
Use Real Words
Human-readable words are easier to remember and communicate verbally.
Compare:
example.com/a8x52q
with:
example.com/webinar
The second link is far easier to mention in a video, presentation, podcast, or conversation.
Prefer Lowercase Letters and Hyphens
Keep naming conventions consistent.
Examples:
example.com/seo-guide
example.com/free-trial
Consistency reduces typing errors and makes your campaign URLs easier to manage.
Should a Vanity URL Use a 301 or 302 Redirect?
This is one of the most commonly misunderstood parts of vanity URLs.
A 301 redirect generally indicates a permanent move. A 302 redirect indicates that the redirect is temporary.
Google explains that permanent redirects such as 301 and 308 are signals that the target should be treated as canonical, whereas temporary redirects such as 302 and 307 do not send the same permanent canonicalization signal.
For example, if:
example.com/services
has permanently moved to:
example.com/solutions
a permanent redirect makes sense.
But if:
example.com/weekend-sale
temporarily points to a specific promotion that will change shortly, a temporary redirect may better reflect the situation.
Do not automatically choose 301 simply because it is familiar.
Can Vanity URLs Help SEO?
A vanity URL is not an automatic ranking shortcut.
Its primary benefits are usability, branding, memorability, and campaign management. A clean URL may also be easier for people to recognize, type, and share.
The SEO value comes from implementing redirects correctly rather than from simply shortening a URL.
For permanent URL migrations, redirects help search engines understand where content has moved. Google specifically advises sending an old URL directly to its final destination and avoiding unnecessary redirect chains because chains add latency and complicate crawling.
For example, avoid:
/deal → /promotion → /products/sale → /final-offer
Prefer:
/deal → /final-offer
Vanity URLs and UTM Tracking
One particularly useful strategy is placing campaign tracking parameters inside the destination while keeping the public URL clean.
Instead of promoting:
example.com/course/?utm_source=instagram&utm_medium=social&utm_campaign=autumn_launch
you can promote:
example.com/course-offer
The vanity URL can then redirect to the full tracking URL.
This gives marketers a cleaner public-facing link without sacrificing campaign attribution.
You could also create separate vanity URLs for individual channels:
example.com/instagram
example.com/youtube
example.com/email
Each can point to the same landing page with different tracking parameters.
That makes campaign reporting easier while keeping the URLs visitors see simple.
Common Vanity URL Mistakes to Avoid
Creating Redirect Chains
Every vanity URL should ideally point directly to its final destination.
Do not keep redirecting old vanity URLs into newer vanity URLs. Google recommends keeping redirect chains low and, whenever possible, redirecting directly to the final URL.
Reusing the Same Slug
Before creating /sale, check whether a WordPress page, post, category, custom post type, or existing redirect already uses that path.
Slug conflicts can produce unexpected results.
Making URLs Too Generic
Links such as:
/go
/click
/link1
may be short, but they provide almost no context.
Prefer descriptive paths such as:
/book-demo
/pricing
/summer-sale
Changing Vanity URLs Too Often
A vanity URL becomes valuable when people remember and reuse it.
If you advertise example.com/demo across videos, printed materials, and emails, avoid changing it without a strong reason.
You can change the destination behind the vanity URL while keeping the public address consistent when that fits the campaign.
Forgetting to Test Mobile and HTTPS
Always test the completed link on both desktop and mobile.
Also confirm that it resolves to the HTTPS version of your destination and does not introduce unnecessary HTTP-to-HTTPS or www/non-www redirect hops.
Redirecting Everything to the Homepage
A vanity URL should lead to the destination users reasonably expect.
For example:
example.com/pricing
should not unexpectedly send visitors to the homepage.
Relevant destinations provide a better user experience and make campaign links easier to trust.
What Happens if Your Vanity URL Returns a 404?
First, confirm that the slug is correct.
Then check:
- Whether the redirect is enabled
- Whether another page uses the same slug
- Whether your plugin is active
- Whether the target URL is valid
- Whether WordPress rewrite rules need refreshing
WordPress notes that its permalink system depends on rewrite rules. Visiting Settings → Permalinks causes WordPress to flush those rewrite rules, which can help when a newly configured URL is not resolving correctly.
Do not repeatedly change permalink settings just to troubleshoot. First verify the redirect and slug configuration.
Can a Vanity URL Point to Another Website?
Yes.
For example:
yourdomain.com/facebook
could redirect visitors to your business’s Facebook page.
Similarly:
yourdomain.com/partner
could point to a partner landing page, and:
yourdomain.com/register
could send visitors to an external registration platform.
This can be useful because you continue sharing an address on your own branded domain even when the final destination is hosted elsewhere.
If the third-party destination changes later, you can update the redirect without replacing the public-facing vanity URL everywhere it was previously published.
Can You Create Multiple Vanity URLs for the Same Page?
Yes, and there are valid marketing reasons to do so.
Imagine the destination is:
example.com/software/free-trial/
You might create:
example.com/youtube-demo
example.com/email-demo
example.com/podcast-demo
Each vanity URL could point to the same landing page while carrying different tracking parameters.
However, do not create dozens of unnecessary variations merely for SEO. Vanity URLs are most useful when each one has a clear user or campaign purpose.
Best Practices for Managing Vanity URLs at Scale
As the number of links grows, organization becomes important.
Maintain a simple record containing each vanity URL, its destination, campaign purpose, redirect type, owner, and creation date. For time-sensitive campaigns, also record when the link should be reviewed or retired.
Use predictable naming conventions such as:
/event-name
/product-demo
/download-guide
/campaign-offer
This prevents duplicate links and makes it easier for other team members to understand what each redirect does.
For important permanent redirects, periodically check that the destination still returns a successful response and has not itself been redirected elsewhere.
Frequently Asked Questions
What is the easiest way to create a vanity URL in WordPress?
For an existing WordPress page that simply needs a shorter permanent URL, edit the page slug. For a shortcut that should redirect somewhere else, use a redirect or link-management plugin.
Do I need a plugin to create a vanity URL?
No. You can change WordPress page slugs or configure server-level redirects manually. Plugins simply make redirect management easier for users who do not want to edit server configuration.
Can I create a vanity URL for an affiliate link?
Yes. A branded shortcut can make a long affiliate destination easier to share. Make sure your use of affiliate links still follows any applicable disclosure, advertising, and platform requirements.
Can a vanity URL contain keywords?
Yes, when they naturally describe the destination. A short path such as /wordpress-hosting is more descriptive than /link829, but adding extra keywords purely to manipulate rankings is unnecessary.
Should vanity URLs be indexed by Google?
Usually, a vanity URL used purely as a redirect does not need to become a separate indexed page. Its purpose is to route visitors to the actual destination.
Can I change where a vanity URL points later?
Yes. That flexibility is one of its main advantages. You can keep promoting the same memorable public URL while updating its destination when appropriate.
Conclusion
Understanding how to create a vanity URL in WordPress comes down to deciding whether you need a cleaner permanent page URL or a memorable redirect.
Use a customized WordPress slug when the shorter address should become the page’s real URL. Use a redirect or link-management plugin when you want branded shortcuts for campaigns, downloads, affiliate destinations, social channels, or tracked marketing links.
Whichever approach you choose, keep the vanity URL short, descriptive, and stable. Send it directly to the intended destination, use the correct redirect type, and test it before publishing. A well-managed vanity URL may look simple to the visitor, but that simplicity is exactly what makes it useful.
Maintain a simple record containing each vanity URL, its destination, campaign purpose, redirect type, owner, and creation date. For time-sensitive campaigns, also record when the link should be reviewed or retired.
Use predictable naming conventions such as:
/event-name
/product-demo
/download-guide
/campaign-offer
This prevents duplicate links and makes it easier for other team members to understand what each redirect does.
For important permanent redirects, periodically check that the destination still returns a successful response and has not itself been redirected elsewhere.
Frequently Asked Questions
What is the easiest way to create a vanity URL in WordPress?
For an existing WordPress page that simply needs a shorter permanent URL, edit the page slug. For a shortcut that should redirect somewhere else, use a redirect or link-management plugin.
Do I need a plugin to create a vanity URL?
No. You can change WordPress page slugs or configure server-level redirects manually. Plugins simply make redirect management easier for users who do not want to edit server configuration.
Can I create a vanity URL for an affiliate link?
Yes. A branded shortcut can make a long affiliate destination easier to share. Make sure your use of affiliate links still follows any applicable disclosure, advertising, and platform requirements.
Can a vanity URL contain keywords?
Yes, when they naturally describe the destination. A short path such as /wordpress-hosting is more descriptive than /link829, but adding extra keywords purely to manipulate rankings is unnecessary.
Should vanity URLs be indexed by Google?
Usually, a vanity URL used purely as a redirect does not need to become a separate indexed page. Its purpose is to route visitors to the actual destination.
Can I change where a vanity URL points later?
Yes. That flexibility is one of its main advantages. You can keep promoting the same memorable public URL while updating its destination when appropriate.
Conclusion
Understanding how to create a vanity URL in WordPress comes down to deciding whether you need a cleaner permanent page URL or a memorable redirect.
Use a customized WordPress slug when the shorter address should become the page’s real URL. Use a redirect or link-management plugin when you want branded shortcuts for campaigns, downloads, affiliate destinations, social channels, or tracked marketing links.
Whichever approach you choose, keep the vanity URL short, descriptive, and stable. Send it directly to the intended destination, use the correct redirect type, and test it before publishing. A well-managed vanity URL may look simple to the visitor, but that simplicity is exactly what makes it useful.


simplifydiggs com: What It Is, Safety & Trust Guide

TV Guide Jacksonville Florida: Local Channels, Listings & Ways to Watch

WJAX TV Listings: Your Guide to CBS47 Programming
-

 Fashion9 years ago
These ’90s fashion trends are making a comeback in 2017
-
Entertainment9 years ago
The final 6 ‘Game of Thrones’ episodes might feel like a full season
-
Fashion9 years ago
According to Dior Couture, this taboo fashion accessory is back
-
Business9 years ago
Uber and Lyft are finally available in all of New York State
-
Entertainment9 years ago
The old and New Edition cast comes together to perform
-
Sports9 years ago
Steph Curry finally got the contract he deserves from the Warriors
-
Sports9 years ago
Phillies’ Aaron Altherr makes mind-boggling barehanded play
-
Entertainment9 years ago
Disney’s live-action Aladdin finally finds its stars